Reproduced from Hay, G., (2012) What haven't you been doing with paper clay?, The Journal of Australian Ceramics, 513, 44-47. Also reproduced in Hay, G., (2013) Paper clay. Revista International Ceramica, Spain, 129, 36-39. More articles on paperclay here, and by the author here. Reproduced here with permission from the author and editors.
What haven't you been doing with paper clay?
|
Dipsticking with Graham Hay
While paper clay is widely used in studios and classrooms, even experienced practitioners have a incomplete understanding of the technical possibilities. Most have discovered that paper clay can be used in the same manner as we have been taught to used traditional clay. So pinch, coil, slab, slip cast, press moulding and most wheel techniques, are all possible in paper clay. Many people have also noticed that less warping and cracking occurs with paper clay. In this article I want to focus on just one of a number of new techniques; quickly joining dry paper clay to dry paper clay. I have named it, the "dipstick" method. Traditionally large or thin clay works are skilfully built by joining soft, wet clay to soft, wet clay, while drying the rest of the work only enough that it does not collapse under its own weight. When completed, the whole work is dried slowly. Paper clay offers the opportunity to join together thinner pieces, which can be pre-dried, with no lengthly drying period at the end. Considerable savings in time are possible, with reduced fatal errors, and cracking. The following advise applies to any paper clay, regardless of the amount of paper (processed cellulose fibre) in the clay, and regardless of the type of clay used to make the paper clay (be it earthenware, terracotta, raku, stoneware, porcelain, bone china). Bear in mind that the hollow paper fibres provide pipes through dense clay bodies. These pipes enable water, steam, air and heat to move quickly through the clay. The two key things to watch out for when joining dry paper clay to dry paper clay is the degree of dryness of the two pieces, and secondly the thickness of the pieces. Provided you clearly understand the importance of these two things, your dried and fired joins will be as strong as the rest of the ceramic work. Completely Dry Firstly, it is essential to make sure the dry paper clay is completely dry. The paper clay should be completely dry, to ensure it has reached its maximum tensile strength. This reduces the likelihood of you accidentally breaking work during joining. Also, completely drying the paper clay will shorten the time it takes the paper clay to siphon water into and later away from joins, and so soften and then dry (firm up) the joins respectively. When joining dry pieces of paper clay, think of the processes as temporarily converting the joining area back to soft clay, just long enough to make the join. Only through experience will you will discover how much water to add to the dry paper clay, and how long is the time window you have to make a successful join. If the clay feels cool to touch, it is not completely dry. Not completely dry paper clay can be speed dried via hot sun and/or a warm wind, or for the very impatient, a hot fan heater outside on a 35+ oC (95+ oC) day! If it is cold, it's best to place the heater on a table, otherwise you are trying to heat up and use the colder air at ground level. Hydrologic Mass Consider now what I'll label the "hydrologic mass" of the joining parts. This is the capacity of the piece of dry piece of paper clay to absorb water. Most people incorrectly consider the size of the area to be joined when considering how long to soak the joining areas of the dry paper clay. Actually, the larger the hydrologic mass of a piece to be joined, the longer it has to be soaked. Therefore joining two different sized pieces of dry paper clay will required different soaking times. Note both soaking pieces should be removed simultaneously from the water/slip, and just seconds before making the join, otherwise the moisture will be siphoned away from the joining area prior to joining. The surfaces to be joined must be still shiny wet, not just damp, when joined together. Soaking time can be reduced by soaking the dry paper clay in watery paper clay slip, rather than thick slip. Soaking in hot, clean water before adding joining paper clay slip is an option for the very impatient. Increasing the paper content in handmade paper clay has also been a strategy for those specialising in dry to dry joins. By using completely dry paper clay, then the maximum amount of clay (within the paper clay slip) is sucked quickly into the two joining surfaces, and that once the join is made, any surplus water is siphoned away from the join (into the dry part of the piece), drying the join out quickly and so strengthening it quickly. The quicker each join dries and firms up, the sooner weight can be placed on it and more joins made. Obviously, thinner pieces of dry paper clay require less soaking time prior to joining, and can be more quickly dried after joining, compared to thicker pieces. What to look for. Each paper clay maker or manufacturer may use a different amount or type of paper in their paper clay. Also there are many different equations used to describe the percentage of paper in their paper clay (dry weight, dry volume, wet volume etc) so it is best to make a small siphoning test in your studio or classroom. Use a timer to measure how quickly different thicknesses of dry paper clay become soft or start to disintegrate in the water. After they have been removed from the water, time and observe how quickly they siphon the water away from the join area. Completely flat joins or clean breaks can be soaked and joined with paper clay slip (or without slip if soaked long enough so that the dry paper clay converts into slip). Over the last 20 years Graham has given over 200 workshops in a dozen countries, participated in (or lead) paper clay conferences/symposiums in Scotland, Denmark, US, Hungary and Sweden, participated in 120 exhibitions and published 20 paper clay journal articles. For detailed information and video on how to use paper clay visit www.grahamhay.com.au. |
The following photos provide an indication of what to look for when soaking dry paper clay prior to making a join:
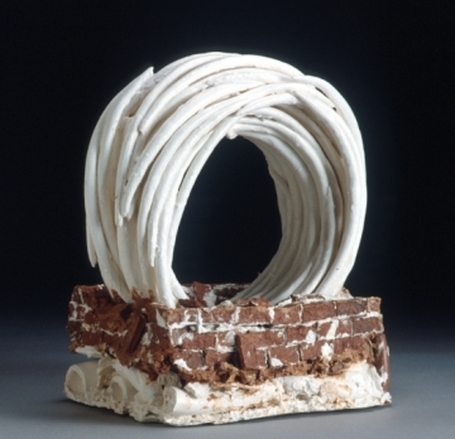
Spin (2001), earthenware & terracotta ceramic paper clay, 37 x 35 x 22 cm, photo: Victor France, purchased by Fran Dennis.
All parts dried, dipped and stuck together with earthenware paper clay, fired to 1160 C.
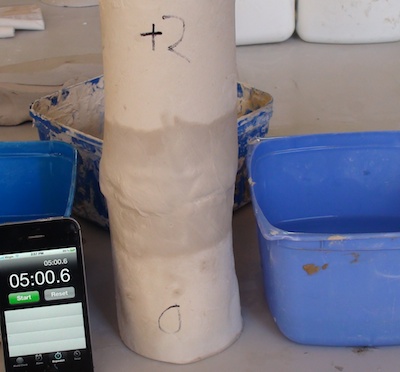
Image 1: In the above image the two pieces of dry paper clay on the left was soaked in cold water, and the right two were soaked in hot water. Compare the two thick pieces in the middle and how far the water was absorbed into the dry paper clay. The second from the left piece should be soaked in water for longer (as it is not yet even leather hard), while the third from the left has adsorbed too much water (has begun to structurally disintegrate) and should be left out for a little while to firm up into plastic clay consistency before joining.
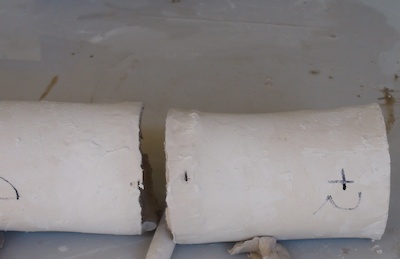
Image 2: In the above example uneven joining surfaces were soaked (top 7 minutes, lower one 5 minutes) before joined together with a coil of soft paper clay (dipped in paper clay slip) between them. Be careful not to pull the soft paper clay up onto areas surrounding the join, which may not have been wet long enough to soften. If you do, hairline cracks on the join line will appear.
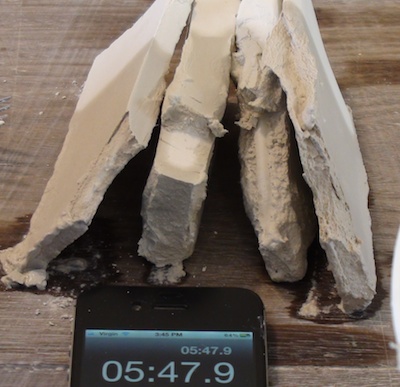
Image 3: Always test the tensile strength of completely dry joins to discover the ideal duration to soak that particular paper clay (or thickness) prior to joining, to create the strongest joins. In this example the piece on the right was soaked for two minutes longer than the other piece, before joined together with soft paper clay between them, After completely drying, I bent the work and the join broke on the left side of the joining soft paper clay coil (marked with two small black marks).
|
Reproduced from Hay, G., (2012) What haven't you been doing with paper clay?, The Journal of Australian Ceramics, 513, 44-47. Also reproduced in Hay, G., (2013) Paper clay. Revista International Ceramica, Spain, 129, 36-39. More articles on paperclay here, and by the author here. Reproduced here with permission from the author and editors.