More ceramic journal articles on paper clay here
THE CREATIVE PROCESS OF PAPERCLAY
|
THE CREATIVE PROCESS OF PAPERCLAY
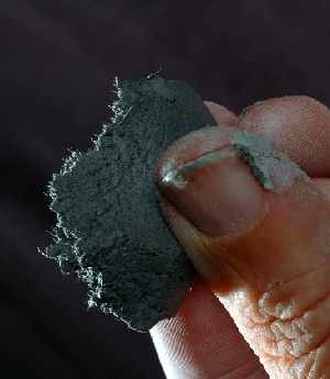
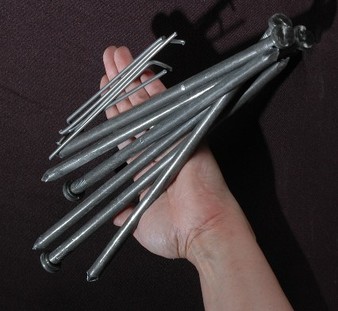
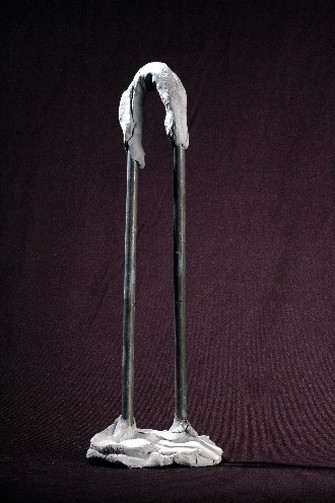
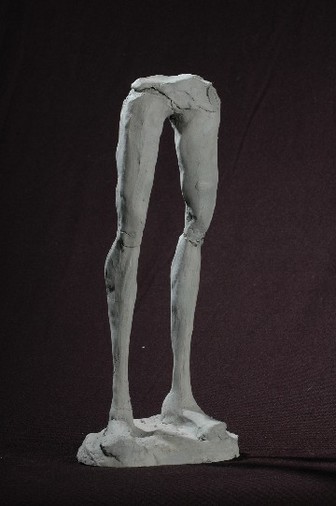
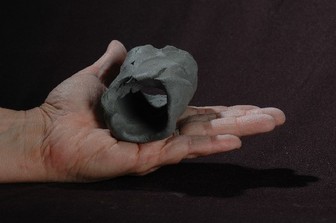
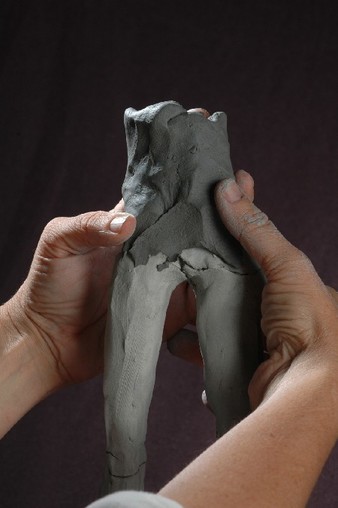
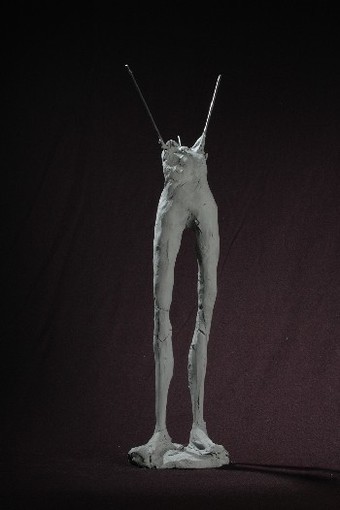
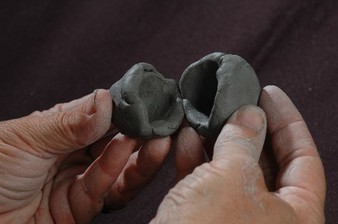
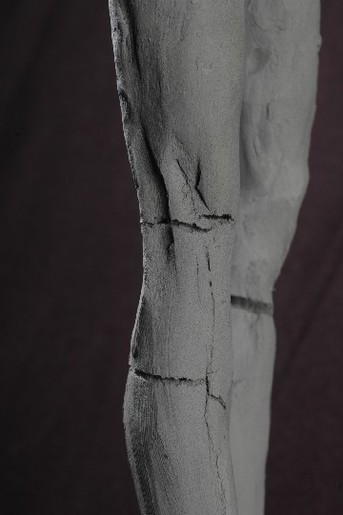
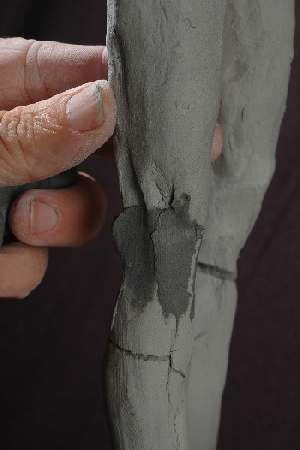
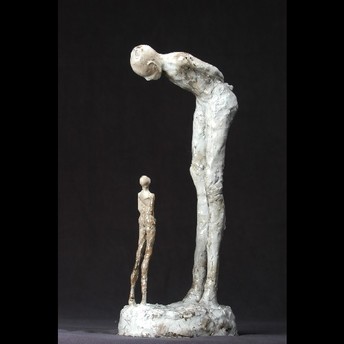
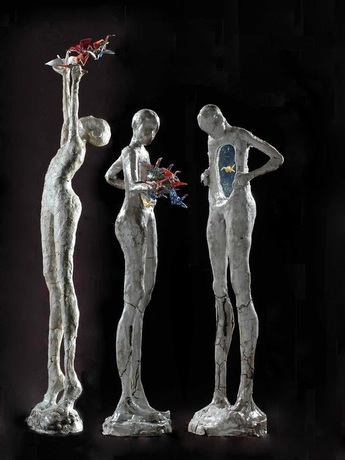
by Lorri Acott Fowler As a beginning sculptor, I used armatures and oil based clay, materials used when an artist intends to have a mold made and then have the sculpture cast in another material, generally bronze. For a while, this worked, but I disliked the mold making and casting process and I did not have the disposable income to cast the many pieces I wanted to sculpt. In my search for the perfect medium, I tried different materials; air dry paper clay, concrete, winterstone, stucco, polymer clay, and regular ceramic clay, all having benefits and drawbacks. I liked to build an armature support under the air-dry materials; I liked the movement and fluidity of clay, but I did not know how to combine the two. As I began working in ceramic clay, I was frustrated repeatedly as the legs of my elongated sculptures broke. I could not repair the clay sculpture once it was broken before firing. I then began to experiment with paperclay. Through experimentation, I developed a way to use this medium, one that suits my needs and is different from the methods of most others who use it. The main difference is that I use huge pieces of metal within fired clay. I was told this would not work, but it works for me. Why Paperclay Works Paperclay is regular ceramic clay with paper fiber added. You can pull it apart and see the fibers. Some artists make their own paperclay, but I prefer to spend my time and energy sculpting and buy mine from a nearby supplier. One of the greatest attributes of paperclay is that before it is fired, it can be repaired when broken. This benefits a sculptor since pieces can be broken off and moved as well as repaired. In addition, you can make an armature in clay, allow it to dry completely for added strength, and then add wet clay to the strong armature. Because tiny paper fibers on the bone dry clay act as tiny paper towels, fresh wet paperclay will bind to bone dry paperclay. When you add very wet clay to the dry clay, the moisture and clay particles from the wet clay are wicked into the dry clay via the paper. This creates a bond that will not crack off as it dries. The paper fibers also create another opportunity. When one uses a metal armature with regular ceramic clay, the clay shrinks, dries, and falls off the metal before it can be fired. With paperclay, the paper fiber creates a weave that holds the clay together as it shrinks. There are cracks, but they are many fine cracks that allow the clay to stay on the armature, and since wet clay can be added to dry clay, you can fill in those cracks before firing. (close up of dry clay on armature) This has been a great benefit; one allowing me to use an armature in my clay sculptures so they can be elongated without breaking or sagging. Armature Materials Through trial and error, I found that the following armature materials work best for me. Twelve-inch ungalvanized spike nails work for the legs of my pieces or steel dowels cut to the size needed. If they need to be bent, use a sledgehammer. For the smaller pieces, strong steel wire (at least 14 gauge) or sod staples cut in half work well. It is essential to use steel armature material. Copper, aluminum, and brass melt at lower temperatures and will not withstand the kiln's heat. The heavier the piece, the heavier the armature needs to be to hold it in the heat of the kiln. I often use very heavy steel in the legs, but something lighter in the arms. Building/Using the Armature When building an armature, I use the steel only where it is necessary for stability in the creation of the sculpture or for strength in the finished piece. 1. Start with a small slab of clay on the table; maybe ½ inch tall. This is the base where the figure will stand. Into this base, push two steel nails head down, and pinch the clay up around the nails so they are stable in the clay. To add more stability, connect them at the top with another piece of clay. This creates the place where the hips of the figure will be. 2. Let it dry completely. For those of you who have worked in water-based clay, this is counterintuitive. However, it is the key for a stable armature onto which you can build. 3. Now build up the legs and let them dry. This creates a more stable base prior to the addition of clay for the body, head, and arms. Importantly, when you add wet clay to dry clay, you first dunk the wet clay into water, then push it firmly onto the new clay and rub it in a little. This allows the paper in the dry clay to have something to absorb and aids in the binding of the wet to the dry clay. Any time you make the dry clay wet, you reduce its strength. Build the legs and lower body and let it dry again so it becomes strong enough to handle the pressure of additional clay. As you become experienced in this method, you will know when to stop and let your piece dry before going further. Since I am vigorous in my application of clay, I let things dry completely between steps. Consequently, I work on many sculptures at the same time. To speed the process you can use a blow dryer, heat gun, or the oven at 250 degrees. 4. After the legs have dried, work on the body. I do not use a steel armature in the body because overuse of them will create more cracking. Instead, form a hollow cylinder using wet clay, dip the end of it in water, and attach it to the legs. It is easier to add to the dry clay than to take away from it. I start smaller or narrower than I think I want the finished product to be, and add more clay after the first layer is dry. To remove dry clay, you re-wet it and scrape it off, or break it off with pliers. The air pocket inside the cylinder is not a problem unless you put in newspaper to hold its shape. I quit using newspaper inside and letting it burn out, since it has caused explosions in my kiln even when I was certain the moisture was driven completely out. Think of air pockets this way, big air pockets are fine; they give enough escape routes for any remaining moisture. Little air pockets are disastrous. It is better to have cavernous areas inside the sculpture instead of thick pieces of clay that could contain many small and deadly air pockets. If adding any wire to support the neck or the arms, do it now, before the clay is dry. Then pinch around the wire and let it dry completely again. 5. When completely dry, the torso is strong enough to support the head. Make the head hollow and remember, big air pockets are better than small ones. Make two small pinch pots and seal them together to make a hollow ball; the air pressure inside the ball allows you to push it gently into the shape that you want for the head. Put clay around the wire for the neck and push the sculpted head onto the wire. The clay for the arms can be added as well. Breaking and Repairing Green clay (dry, but not fired) A wonderful aspect of this clay, compared to regular clay, is that you can repair it. Because of the shrinkage of the clay against the metal armature, your dry sculpture may develop a few cracks that are easy to fix. Take fresh wet clay, dip it in water, and push in into the cracks rubbing it into the surrounding areas as well. After it dries, you will have smaller cracks in the same areas. Use goopy clay (slip) in these areas, rubbing it in. Eventually the cracks will go away and you will be ready to let it dry completely for firing. Sometimes, parts of your sculpture may break off in the process; this is no problem. Wet a fresh piece of clay and put it between the broken pieces. It is important to push the pieces firmly together and let it completely dry. Firing The key to firing paperclay with embedded steel is to fire it at a low temperature. Clay shrinks and metal does not. The hotter you fire the clay, the more it shrinks and the more the metal softens and may begin to bend. It is important to use low fire clay. If using an electric kiln, firing at 04 or 05 works well. I raku fire my pieces, firing them once. I glaze them green so it is essential for them to be completely dry before going into the kiln. I do not recommend the raku method when first using paperclay. The rate of breakage is higher, and the repair work is more complicated. After firing, you will find some problems when you open the kiln; there are more cracks in your sculptures than before. If you experimented with the wire, some of it may have bent from the weight of the clay; or perhaps, you find that some pieces of clay have cracked and fallen off the sculpture where the clay was thin over the armature. Do not worry; this is part of the process. If you who know the bronze process, you understand that there are many steps before you finish a piece. Thus, it is with steel armatures inside paperclay. Post Firing Repair In the area of post firing repair, most of my students become frustrated. Because of their experience with pottery, they expect the sculpture to come out of the kiln finished and perfect. In reality, with my method, this is where the work often begins. My sculptures start out being paperclay and end up being mixed media. Elmer's Glue and Epoxie Putty are two of my essential materials. Elmer's Glue is the ideal adhesive to repair clean breaks with a perfect fit. It works best when using porous material to porous material (clay to clay). It does not fill gaps and only works when broken pieces fit together perfectly. Epoxie Putty is a two-part adhesive putty that works for rebuilding areas or filling gaps. I did a sculpture project where I made complete figures from this putty. If your sculpture has bent in a way that you do not like, bend it back. You can use pliers to get a good grip on it. If you are afraid of breaking it, bend it anyway; you can always fix it. This kind of bending occurs when you have used thin wire with little clay around it and fixing it is worth the trouble. If a leg or arm breaks off, or if something exploded in the kiln, fix that area next. Wear gloves, blend equal parts of the A and B Epoxie Putty until it is one solid color. Use it to attach large pieces together or to fill in holes. This material is ideal for repair in a weight bearing area, drying harder than the original clay. It will set in two hours and you can start on the minor repairs. Take care of minor repairs the same way. Smooth Epoxie Putty with water to blend it in better and texture it to match the clay. You can rebuild ears, hands, and other areas with this material. You can also fill cracks with water putty or wood paste or any such construction materials that are readily available at hardware stores. Finishing Cold finish techniques are ideal for paperclay sculpture. Once they are applied, no one will detect if and where your pieces were broken or cracked. Many of the techniques I learned from clay and mixed media artist Marie E.v.B. Gibbons (Featured in Sculptural Pursuit Summer 2003 Vol 2, No. 3). Other cold finishing techniques include metal paint and patinas, and faux finishing. You can use low fire glazes on paperclay just as on other low fire clays. Repair is more complicated when you have to match a fired glaze, but you can find high gloss enamel paints to mimic the look at hobby art stores. I suggest that you experiment with this paperclay method and try out cold finish techniques before moving in to the more complicated glazes. My process of working with paper clay requires a great deal of work. The repair work required, because of the insertion of metal, is tedious and at times frustrating. That being said, this method allows me the freedom to create one of a kind and affordable pieces for the collector. I am not limited to the techniques used with regular ceramic clay. I can think like a sculptor instead of a potter, as I am more concerned with my forms than the problems involved using water-based clay for my elongated sculptures. If you would like to try clay sculpture, I recommend using this paperclay method. It works for me; it might work for you. Tips for success: 1. Use only steel for your metal 2. Let armature dry completely before adding new clay. 3. Dip fresh clay in water before adding it to dry clay. 4. Large air pockets are best, small ones are disastrous. 5. Fill cracks with fresh clay and let dry before firing. 6. You can repair anything with clay before firing, with Epoxie Putty after firing. 7. Be patient and have fun. |
|
Lorri Acott Fowler is a sculptor whose work in available in several galleries throughout Colorado and Wyoming and who teaches art at Poudre High School in Fort Collins, Colorado. For questions and resource information, contact Lorri and see her work via: http://www.lorriacott.com. Photography by Rick Ney.
Reproduced with kind permission by the author (email: September 14, 2006 5:50 AM). The articule appeared in a slightly different form in Sculptural Pursuit Magazine , 2005, 43-47